Amazing Illustrator 3D Effects And PS Brush Creation
Hilmi
|
Sabtu, 20 Februari 2010
|
0 comments

At first I will show You technique, how to create effects and after that, I’ll show You my ideas and different ways how to implement them.
Step 1
At first I’ll teach You how to create curvy lines, how to differentiate them and later import them to Adobe Photoshop and convert to brushes for later use.
Open Adobe Illustrator and create a new document.
For the fill color use none color, and for stroke use 1px monochrome colors. If You will use them as brush, select black #000000 color.

Select Pen tool(P) and create two curves, there is no matter what Your shape will be, we will later change it anyway. If You want to modify Your curve later, deselect curve, select Direct Selection tool(A) and click on just one point, drag it later to fit curve Your needs.

Now again select all curve, holding ALT click and drag the curve to duplicate it. Then holding SHIFT+ALT resize it smaller to differentiate it.
Select the top curve, right click on it and send it to the back - Arrange–>Send to back.

My result is like this now:

Step 2
Now Select both curves, and go Object–>Blend–>Blend Options..
I used Specified distance, 2px, You can try different settings using Specified distance or Specified steps.


Now with both curves still selected press CTRL+ALT+B or Object–>Blend–>Make to execute those steps.

Bonus Step 3
Select top curve and adjust transparency to 10% to get cooler and more realistic effect.
Press SHIFT+CTRL+F10, if You don’t see the Transparency.

Step 4
Now We will go to Adobe Photoshop and create our own brush!
Resize Your lines holding SHIFT+ALT and dragging them bigger, You must create ~2500×2500px size (it’s maximal allowed size for brush, if You are using Photoshop CS3). Copy and paste Your effect into Photoshop and hide background color.
Press CTRL+ALT+I and check Your document size – if it’s bigger then resize it proportionally with one one of the values 2500px, use Bicubic Sharper, which is better for document reduction.

Now we are ready to create our Photoshop brush:
Edit–>Define Brush Preset and name Your probably first Photoshop brush!
Different Techniques With Adobe Illustrator and Blending tools
Now I won’t be going in so much deep details, I’ll just give You more ideas, how to use the same technique to get different results.
3D text effect
Create text using just stroke color and bring up Stroke panel and check more details and create dashed line:

Now just go through the same steps as I described in previous example, to get this result:

And then just click with Convert to Anchor Point tool on the Anchor points, to get swirly effects.
After this, You can simply import effect in Photoshop and add some spice to it.


Using Spiral tool:

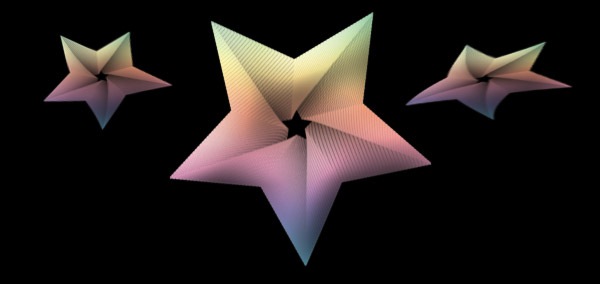
The same effect using dashed star strokes and simple coloring in Photoshop.
Feel free and experiment with different shapes, spirals, type-faces. You can get really technical and amazing effects doing just those simple steps! If You have any more suggestions, ideas – comments will be appreciated!
Filed Under: Tutorial Design

0 comments
Trackback URL | Comments RSS Feed